Wednesday, November 27, 2013

Week 9 - (Creative Lighting)

Unfortunately I was sick for an entire week and have been set back with workload. Due to this, I also have missed out in getting feedback that I may have needed earlier.

This week I splayed specifically for adding creative lights. The last few weeks I had been building up a knowledge about getting more control in Maya whilst also keeping with the quality/appearance of a day lit scene.

METHOD

Aim

The main thing I wanted to concentrate on was to develop a lighting system that was readable and enhance the scene. Naturally I wanted the center court to be working as the focal point as that was the designated stage for action. I also wanted there to be a sense of depth in the shot, so the viewer wouldn’t feel closed in when viewing.   

Fig.1, Base image lit
Setup

In order to establish a base lit scene to work with I used the previous lit scene and added to it. As a further update for the actual environment I chose to have more assets in there to give a more motivation for creative light.

Fig.2, Older light rig

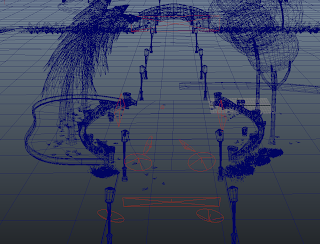
Creative lights added:
-       -   Area lights to light up characters faces  
-       -   Target light to brighten up the center of the court
-        -  Coloured lights for the subjects backdrop (stylistic)
-        -  Golden ambient light to warm up the shot
-        -  Another area light for asset

Fig.3, Light setup from afar

Fig.4, Light setup close

As an addition to creative lighting I also began to remove various lights to supplement for the expense in render time. All the bounced lights were removed and replaced with Final Gather as it was easier to manage and less time to render.

Lights removed or changed:
-        -  Hot distant area lights removed
-        -  All bounced lights (lighting stalls, walls and lamps)
-        -  Distant light increased greatly to light up hill in the distance
-        -  Sky area light replaced with ambient light and light linked solely to it
-        -  Directional light intensity reduced

[image]

RESULTS
Fig.5, Final result


For what I had created I took reference from the environmental lighting in ‘One Man Band’ as it had a similar hierarchy in accordance to what I had.
Fig.6, One Man Band (Andrews & Jimenez, 2005)

AFTERMATH

Light Linking

Another issue I discovered unexpectedly was the practicality of link linking in a 3D animation. As far as setting it up in a scene it is an effective and necessary tool that gives more control over what receives light. When the light rig is exported and referenced into a different scene it seems to lose the retained information and reset all of the specific light connections. The reason to this seems obvious though. If you are importing a rig the information would be retained ideally in connection with the name of the asset and possibly the kind of object itself. When the lights enter a new shot they do not recognise the objects they are meant to connect with and therefore do nothing (aka reset).

I haven’t exactly solved this problem but have promising strategies in dealing with it.

This include:
-          Mel scripting
-          Asset manager
-          Easy Light Link

This wasn’t so much something that I didn’t necessarily need to figure out, but came out of my research.  

Final weeks

Recently I actually did get feedback (despite the major delay) after finally showing the results of my progress. What entailed was a critical kick back into reality of what was needed to be achieved. My thesis was not so much aesthetic based but rather efficiency based relative with the best quality possible. I haven’t really been focusing on the actual timing of my renders which was the point of it all.

My new goal is now clearer. Focusing on trying to get an equally appealing lighting system that is more efficient than using Physical sun and sky. This won’t necessarily mean that I’ll be diverting from other renderers but story telling light has to be axed.

Learning Contract

Updating from new goal

Week 10 – Working out possible ways to lower render times whilst keeping good quality in Maya. I also may show the advantages to having more control over scene lighting rather than Physical sun and sky pre-sets.


Week 11 – Looking at the effect of different renderers within Maya and how they may speed up render time.  

References

Andrews, M.(Director), & Jimenez, A.(Director).(2005).One Man Band [Motion picture].CA, Pixar.

Wednesday, November 20, 2013

Week 8 - (Lighting and Rendering)

This would be the third week that I have been working towards creating a believable daylight scene. As much as it is frustrating that I have been on this for so long it is good that I have a much more thorough understanding of lighting in Maya.

Anyway, advice I got last week was to look into 'Lighting and Rendering' as well as HDRI lighting and colour management. I ended up actually borrowing the book and was wondering why I didn't find it before. A lot of it covered stuff I had already knew (had previously researched) but still came in handy to read.

Method

For the actually experiment for this week I was going to finally study photography and try to simulate a similar lighting setup as I could. Though before I could do that I had to remove the exposure node that I didn't want to be dependent on. From what I learnt, the way to effect exposure without using the node is through colour management.

Fig 1. Base from week 7


Originally all I knew about colour management was at the top of rendering settings. It also lies within each texture that is imported and through the render screen (was hard to find). Through there the image profile is set to linear sRGB and the Display is set to sRGB. This is meant to simulate the correct lighting for most computer screens apparently. This was rendering as an .EXR in order to adjust the gamma correctly (2.2).

Fig 2. Exposure adjustment manually

In addition the light rig I set up other lights to accommodate for bounced light. This was mainly target lights around the center  court as it was the location where the eye would look. There were also area lights put in the back to give variation to the grass (though the shadows do disappear a bit).

Fig 3. Light Setup 1 

Fig 4. Light Setup 2

Fig 5. Final 

HDRI lighting was played with a little. The method which i think was correct that I took was adding it as a skybox then  Final gather it across the scene. The results looked good but the dispersion of light got rid of my hard shadows (maybe it might look good for distant stuff). It also seemed like a mental ray dependant system (of what I discovered). Technically I still use mental ray, but I know I can easier change to other renders with little tweaks rather than have build in mental ray stuff to my rigging.

Fig 6. HDRI (sadly not a good example)

Learning Contract

Thanks to illness and being stuck in IND my learning contract has not only gotten behind but is in need of an update.

Essentially I have covered enough in order to move onto  creative lighting and other things I said I would do.

For week 9 I'd like to move onto creative lighting setups and manipulating the scene that I am currently using. Playing with temperatures of light will be introduced here as well as I have missed out on that week.

For week 10 I'll be looking at the effects still of a couple of renderings in order to both support my research to making efficient light rigs and use of average consumer hardware.


Week 11 might all spill into week 12 but will stand as the amassing of all the work I have done on my experiments. It will be fixated towards trying to create an emotional experience for the viewer through lighting. This will also may be altered through different angles of the scene to have a more depth look into the lit environment. There is a chance this may not happen due to deviating from the thesis but would be cool to end on. I may ask just to clarify.   

References

Birn, J.(2010). [digital] Lighting and Rendering. (2rd edition).Berkeley, CA:New Riders

Wednesday, November 6, 2013

Week 7 - (Light Rig Base Part 2)


Last experiment was a bust

Not only did I panic and use a pre-set mode that worked but I was unable to customise it to my likeliness. The key here is that it worked.

This week my goal was again to achieve a default lighting system for a 3D animation. This time I would be breaking the network of physical sun and sky down (rather than wing it). I had a hunch that if I could understand the parts of how the mode was built, I could customise it to my likings.  

Physical Sun and Sky (PSS)

The ideal lighting situation I was aiming for was an average sunny day in a park at about noon. 

Rather that delve into the web and look into how (PSS) is built, I started by starting with a directional light a moving on from there. The directional light seemed somewhat ordeal due to experiments  I had done in week 4. Bah, Enough tangenting.

In PSS the Directional light has suppressed custom shaders. In both Light Shader and Photon Emitter Physical Sun has been placed. By adding custom shaders both the intensity and shadows features become locked and arent able to be manipulated through the light anymore (my problem with the last experiment). 

Within the Physical sun is the only place to manipulate the shadows and that's just how soft they are.
Physical Sun has further connections with physical sky, connecting most features for them to work well together.

The time of day gets controlled by having the directional light (or its world attributes) connection through the sun slot. This allows the environment to change from a midday setting to a golden evening. 

In order to see what is on screen effectively custom shaders are connected to the camera. This being Physical Sky in the environment shader to view the blue sky and Exposure in the Lens shader.
Finally to help support the distribution of a one light scene final gathering is turned on.

Altogether this builds the product of PSS that is a usable system that can make an environment look good as well as its time of day. For me though it wasn't good enough.     
    
What I did

After building this from scratch I started to rip out stuff that I felt was hindering me. 

- First to go was the Physical Sky. Having that in the connected to anything is what was responsible for the bluish tint I hated. Stripping it out of the camera shaders did that. 

- There was also no need to have Sun Direction as I was sticking with midday so that was stripped out. 

- I wanted to be able to manipulate shadow opacity and light intensity so the Physical Sun was taken out  (as well as Sky then). 

- Turning off the final gathering brought back thick black shadows. Adding 2 Fill lights for the side and front lit them up. Adding a yellow ambient light goldened up the scene to simulate sun light affecting the environment.

 - Adding a light for the distant background only added depth to the scene to simulate light hitting distance.

- A final light was added strictly for the skybox to the light up a sky. Mainly because the Directional light could not work properly within a dome. 

Results
 Before

 After
 

Final thoughts

The results produced default lighting I was comfortable with. From here there still needs to be creative lighting added in order to really help this scene come alive. I just glad this is all starting to work now.